As I have been creating the assets for my film in Illustrator, I've had to design and follow a workflow that works well with the project I am undertaking. The biggest problem I have been facing over the holiday period was the Illustrator / After Effects dynamic in which files are required to be set up properly and organised in correct folders before importing and animating.
I have created Master files for each document that contains assets. This is so when I create a copy ready to be imported into After Effects, and I notice something that could be improved, I can adjust it in the Master document without it affecting the After Effects document e.g.
The Master Document
The After Effects Copy
Font Trouble
Another aspect I've had tone careful about is the use of royalty free fonts that I have downloaded. When I saved the Illustrator file that contained a font I had downloaded, I got a warning message indicating the font wasn't able to save properly in PDF format (an option I decided to keep on whilst creating the Illustrator files)
To get around this, I changed the type I had created using the fonts I had downloaded into Outlines that are made up of anchor points so they could be saved as objects and not type. (seen as orange dots around the edge of each letter in the word 'Phone' for the Phone_Box asset in my scene)
Effects
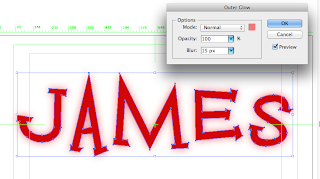
Some assets in my establishing shots required to have certain effects on them to emphasise what they are. The most common effect I've used is the outer glow effect. At the beginning of production, I applied these in Illustrator and then imported them into After Effects, however after testing the document in Ae to see how it looks, I realised I couldnt animate the glow effect since it was locked to the actual object in the layers that made up the assets. To remedy this I've decided to apply the effect in Ae itself instead in Illustrator.
Applying an Outer Glow effect to the object in Illustrator
When animating an object, the effect applied to it in Illustrator could not be animated along with it
Importing into After Effects
Import as Composition - Retain Layer Sizes NOT Footage! This is so each asset in the ai. document can be separated and animated individually.
Quality - Rasterising
The reason I chose Illustrator instead of Photoshop to create the assets for my film was because of the crisp look I could get to the objects. Illustrator uses vectors instead of bitmaps which means the assets won't lose quality and look terrible on screen when animating (particularly rescaling). A lot of my shots feature assets that will need to be resized a lot during animation so Illustrator is definitely the way to go.
Animating
Colour co-ordinating the individual layers really helps in organising and quickly seeing which layer is which


