
Fig. 1. Example illustration from the tutorial
The test file
(different asset shapes and complexities - keeping in mind some assets in the film that may have textures applied to them will be animated through deformation using meshes and the puppet tool.
GRADIENTS
Setting up the Gradient to be textured

Fig. 2. Custom Gradient

Make sure just the gradient is selected (once placed in the layer, press G and click on the box)
^ Like this
Fig. 3. Selecting the Gradient

^ NOT this!
Fig. 4. Selecting the shape layer
Now go to Effect > Texture > Grain

Fig. 5. Applying the Grain Effect

Fig. 6. Editing the attributes of the grain effect
Applying a Colour
Can either edit the colour and position of the colour stops in the Gradient panel or create a new object or fill layer underneath and change the blending mode of the grain to Multiply which will 'add' the colour to the gradient with the grain texture.

Fig. 7. Opening the Appearance panel
Solid Fill Colour

Fig. 8. Applying a new fill layer underneath the gradient fill layer

Fig. 9. Applying the grain effect to the gradient fill layer
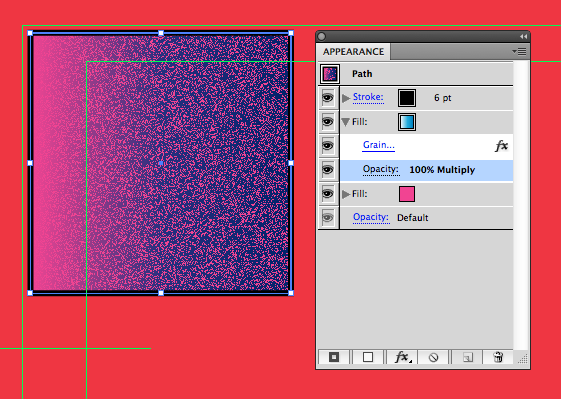
Fig. 10. Changing the blending mode of the gradient fill layer to Multiply
GRADIENT MESHES
Use this technique for when the asset is a complex shape like the one below

Fig. 11. Change colour of shape to black

Fig. 12. Create > Gradient Mesh
GRADIENT MESHES

Fig. 13. Object > Path > Offset Path

Fig. 14. Offset Path menu options

Fig. 15. New layer copy in the layer organiser
Tests


References
Figure. 1. Example illustration from the tutorial http://vectips.com/tutorials/create-grainy-textures/ [Accessed 15th February 2014]
No comments:
Post a Comment